


Toyota Highlander Family Guide
Toyota Highlander Car Seat Tips for Bristol Families
The Toyota Highlander is a family favorite around Bristol because it offers three rows, flexible seating, and practical safety technology. A safe setup still depends on correct car seat placement, proper LATCH or seat belt installation, and the right fit for each child’s age, height, weight, and maturity.
Quick Answer
For most Toyota Highlander families, the second row is the easiest place to install car seats because it typically gives better access to lower anchors, tether anchors, and daily buckling space. Always confirm the exact LATCH and tether locations in your Highlander owner’s manual, then use either LATCH or the seat belt for the lower attachment. For forward-facing seats, use the top tether whenever the seating position and car seat instructions require it.
Key Takeaways for Bristol Parents
Use the Manual First
Check both the Highlander owner’s manual and the car seat manual before choosing LATCH or seat belt installation.
Confirm a Tight Fit
A properly installed car seat should move less than one inch side to side or front to back at the belt path.
Recheck Often
Growth spurts, seasonal clothing, seat movement, and caregiver changes are all good reasons to recheck fit.
Table of Contents
Highlander LATCH Locations and Access
Most Highlander models provide lower LATCH anchors for the second-row outboard seating positions and top tether anchors in designated seating positions. The second-row center position may not have dedicated lower anchors, depending on the model year and seating configuration. If lower anchors are not available for the position you want to use, install the car seat with the seat belt and follow the car seat manufacturer’s instructions.
For the third row, check your exact Highlander owner’s manual before moving a car seat rearward. Some Highlander configurations include third-row tether access, but third-row lower LATCH anchors may not be available. That means the seat belt method may be the correct approach for third-row installations.
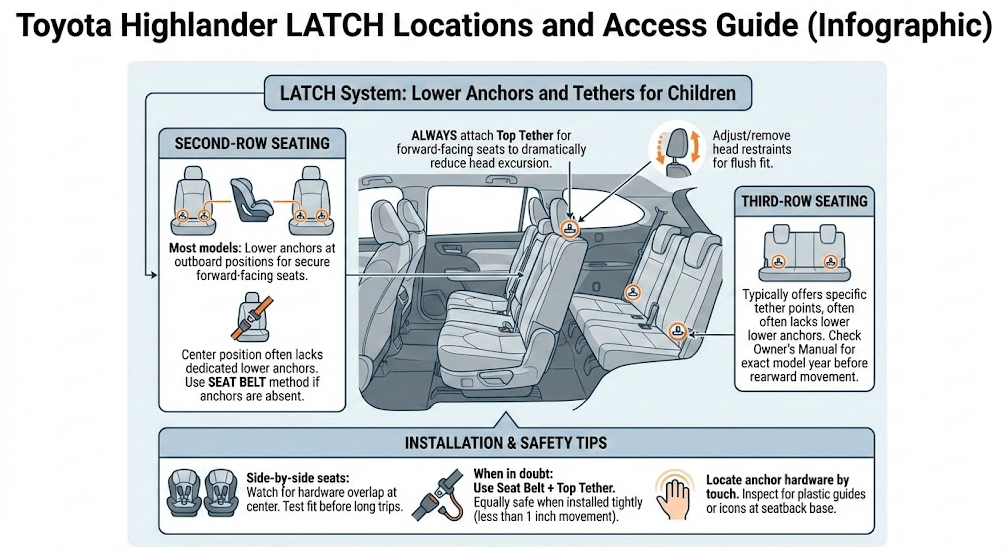
Safety note: Do not assume every seating position has lower anchors. LATCH locations vary by model year, trim, and seat configuration. The vehicle owner’s manual and the car seat manual should be the final source for your setup.
Finding Anchors Fast on Delivery Day
New vehicle day is the best time to learn the cabin while the seats are empty. Slide and fold the second-row seats, locate lower anchor icons, identify tether anchor points, and practice the route before installing the seat. If you have a booster rider, check that the lap belt sits low across the hips and that the shoulder belt crosses the middle of the chest and shoulder.
Keep a small flashlight in the cargo area so caregivers can locate anchors and buckles more easily. If your car seat manual allows a rolled towel or pool noodle for rear-facing recline support, store one with your car seat supplies. Do not use accessories or positioning aids unless the seat manufacturer allows them.
Car Seat Installation Basics
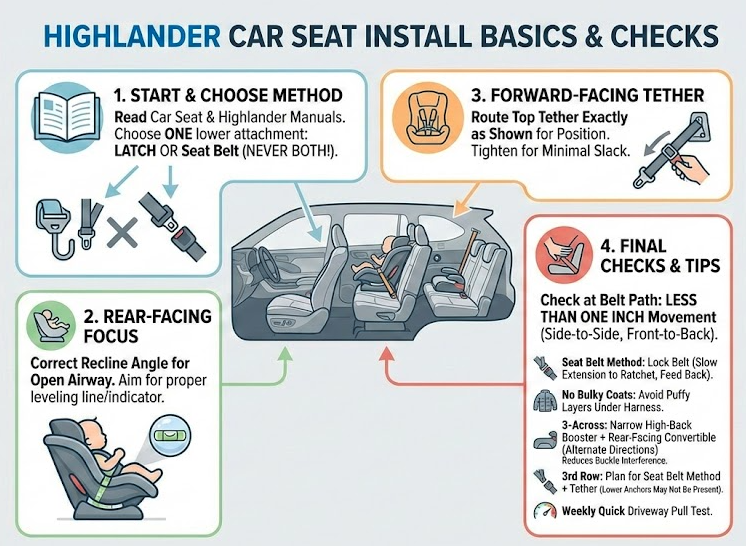
Start with your car seat manual and your Highlander owner’s manual. Choose either LATCH or the seat belt for the lower installation, not both, unless your specific car seat manufacturer clearly allows that setup. For rear-facing seats, confirm the recline angle shown by the seat. For forward-facing seats, route and tighten the top tether according to the seating position instructions.
After installation, grab the car seat at the belt path and pull side to side and front to back. The seat should move less than one inch at that point. Do not test by pulling from the top of the seat, since that can make a properly installed seat appear loose.
| Installation Method | Best Use Case | What to Check | Common Mistake to Avoid |
|---|---|---|---|
| LATCH lower anchors | Second-row positions with dedicated lower anchors. | Correct anchor location, tight belt path, car seat weight limit. | Using lower anchors in a seat position that does not have approved anchors. |
| Seat belt installation | Center positions, third-row positions, or seats without lower anchors. | Locked belt, correct belt path, less than one inch of movement. | Leaving the seat belt unlocked or routing it through the wrong path. |
| Top tether | Forward-facing installations where a tether is required. | Correct tether anchor, proper routing, minimal slack. | Skipping the tether on a forward-facing harnessed seat. |
| Booster with vehicle belt | Older children who have outgrown a harnessed seat and can sit properly. | Lap belt low on hips and shoulder belt across chest and shoulder. | Letting the child put the shoulder belt behind the back or under the arm. |
Driveway Installation Checklist
- Read the Highlander owner’s manual.
- Read the car seat manual.
- Choose LATCH or seat belt installation.
- Use the correct belt path for rear-facing or forward-facing mode.
- Attach and tighten the top tether for forward-facing seats when required.
- Check for less than one inch of movement at the belt path.
- Confirm harness height and chest clip position.
- Remove bulky coats before buckling.
Best Highlander Seats for Different Family Setups
The best car seat position depends on your child’s seat type, the Highlander seating configuration, and how your family uses the cabin every day. For many Bristol families, second-row outboard seats are the easiest option for infant seats and convertible seats because access is simpler for school drop-offs, grocery stops, and daily buckling.
If you are trying to place multiple children across the second row, test the setup before a long trip. Buckle overlap, seat width, armrests, and access to the third row can all change how practical the arrangement feels. A narrow car seat or high-back booster may help, but every setup should still pass the tightness and belt-fit checks.
| Family Setup | Practical Highlander Strategy | What to Watch |
|---|---|---|
| One infant seat | Use an accessible second-row seating position and confirm base angle. | Front-seat clearance and correct recline angle. |
| Two harnessed car seats | Try both second-row outboard seats first for easier daily access. | Door clearance, caregiver reach, and top tether routing for forward-facing seats. |
| Booster plus car seat | Place the booster where the child can buckle independently without disturbing the car seat. | Buckle access and correct shoulder belt fit. |
| Three children | Test fit before travel and consider which child needs the most help buckling. | Buckle overlap, third-row access, and seat width. |
| Grandparent or caregiver vehicle | Label seating positions and keep instructions in the vehicle. | Repeated reinstall errors and missed tether steps. |
Harnessing and Booster Readiness
A snug harness should pass the pinch test at the collarbone, and the chest clip should sit at armpit level. Children should stay rear-facing as long as allowed by the height and weight limits of their seat. When a child moves forward-facing, use the top tether and keep the child harnessed until they meet the seat manufacturer’s booster requirements.
When moving to a booster, fit matters more than convenience. The lap belt should sit low across the hips, not the stomach. The shoulder belt should cross the middle of the chest and shoulder, not the neck or face. If your child slouches, leans, moves the belt behind their back, or cannot stay seated correctly for the full ride, they may not be ready for a booster.
Booster Fit Checklist
- The child sits upright for the entire ride.
- The lap belt rests low across the hips.
- The shoulder belt crosses the center of the chest and shoulder.
- The shoulder belt is never behind the back or under the arm.
- The child’s knees bend comfortably at the vehicle seat edge when ready for seat belt use.
- The child follows the same safe position every trip.
When to Replace or Refit a Car Seat
Replace a car seat after a moderate or severe crash, after it expires, or if it has missing parts, frayed harnesses, damaged components, or an unknown history. Expiration dates are usually molded into the shell or printed on a manufacturer label. If the label is faded or missing, contact the car seat manufacturer before continuing to use the seat.
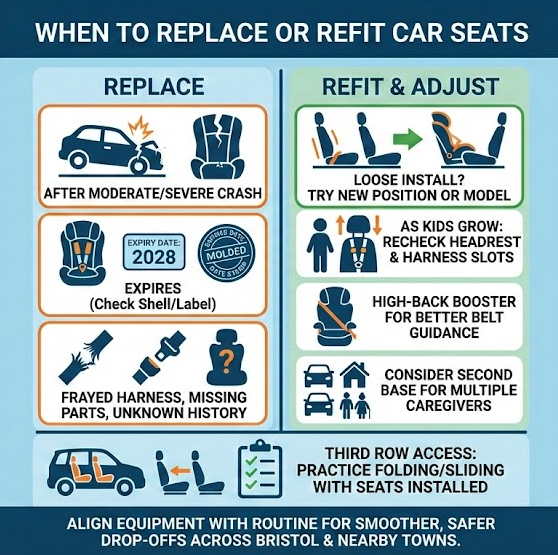
Refitting is also important as kids grow. Recheck harness slot height, headrest position, recline angle, and booster belt fit after growth spurts, seasonal wardrobe changes, and any time a seat is moved. If a car seat no longer installs tightly in one Highlander position, try another approved seating position or a different seat model that better matches the vehicle seat shape.
Seasonal Checks for Bristol Families
Bristol weather can change quickly, so seasonal car seat checks are worth building into your family routine. In winter, remove bulky coats before buckling and use a blanket over the secured harness for warmth. In summer, check buckle temperatures and keep a towel in the cabin to shade dark fabric when parked.
Each season, run through a short reinstall check. Confirm less than one inch of movement at the belt path, verify tether routing, inspect harness condition, and make sure caregivers know which seat goes where. A five-minute check can prevent common errors during busy school mornings, sports weekends, and Tri-Cities road trips.
Important: Toyota of Bristol can help you locate anchors and review your Highlander seating layout, but a certified Child Passenger Safety Technician is the best resource for a full car seat safety inspection.
Need Help Reviewing Highlander Seating?
Visit Toyota of Bristol for a quick Highlander anchor walk-through. Our team can help you find LATCH points, review top tether locations, explain third-row access, and point you toward local child-passenger safety resources for a certified installation check.
Toyota Highlander Car Seat FAQ
Where are the LATCH anchors in a Toyota Highlander?
LATCH locations vary by model year and seating configuration, but many Highlander models provide lower anchors for second-row outboard seats and top tether anchors in designated positions. Always confirm the exact anchor locations in your Highlander owner’s manual before installing a car seat.
Can I use LATCH and the seat belt at the same time?
Use either LATCH or the seat belt for the lower installation unless your car seat manufacturer specifically allows both. The car seat manual and the Highlander owner’s manual should guide the installation method.
Does the Toyota Highlander third row have LATCH anchors?
Third-row lower LATCH anchors may not be available, depending on the Highlander model year and configuration. If lower anchors are not present, use the seat belt method when allowed by the car seat instructions and confirm whether a tether anchor is available for forward-facing installations.
How tight should a car seat be in a Highlander?
After installation, pull the car seat at the belt path. It should not move more than one inch side to side or front to back at that point. If it moves more than that, reinstall the seat or ask a certified technician for help.
When should I replace a car seat?
Replace a car seat after a moderate or severe crash, after it expires, or if it has damaged parts, missing labels, frayed harnesses, or an unknown history. Check the manufacturer label or manual for expiration details.
Can Toyota of Bristol install my car seat?
Toyota of Bristol can help you locate Highlander anchors and understand the seating layout. For a full safety inspection, we recommend working with a certified Child Passenger Safety Technician.


